Introduction to Express.js
Express is a web application framework that uses modular components called middleware
to implement web application logic in a reusable and organized manner. In Express, middleware functions
intercept the request and response objects provided by the HTTP server, perform
specific logic, and then either end the response or pass control to the next middleware function in the stack.
Express “expresses” the flow of middleware using an internal routing and middleware mechanism that manages this sequence.
Express allows developers to write their own middleware, while also providing a variety of built-in and third-party middleware for handling common tasks such as request logging, serving static files, parsing request bodies, handling cookies, and managing sessions. Express builds on the ideas introduced by Connect and enhances them with additional features, such as a powerful routing system and improved developer experience.
Because of its modular design, Express serves as both a complete web framework and a flexible foundation for building higher-level frameworks.
When building a web server in Node.js, you typically write a single JavaScript function that handles all incoming requests. This function listens for requests from web browsers, mobile applications, or any other clients interacting with your server. Upon receiving a request, it determines the appropriate response.
For example, if a user visits the homepage, the function can return HTML content. Similarly, if an API endpoint is accessed, it can process the request and respond with JSON data.
Request Handling in Node.js Without Express
If you build a web application directly on Node.js without using Express, your server must handle client requests manually. A client hitting your server might look like below:
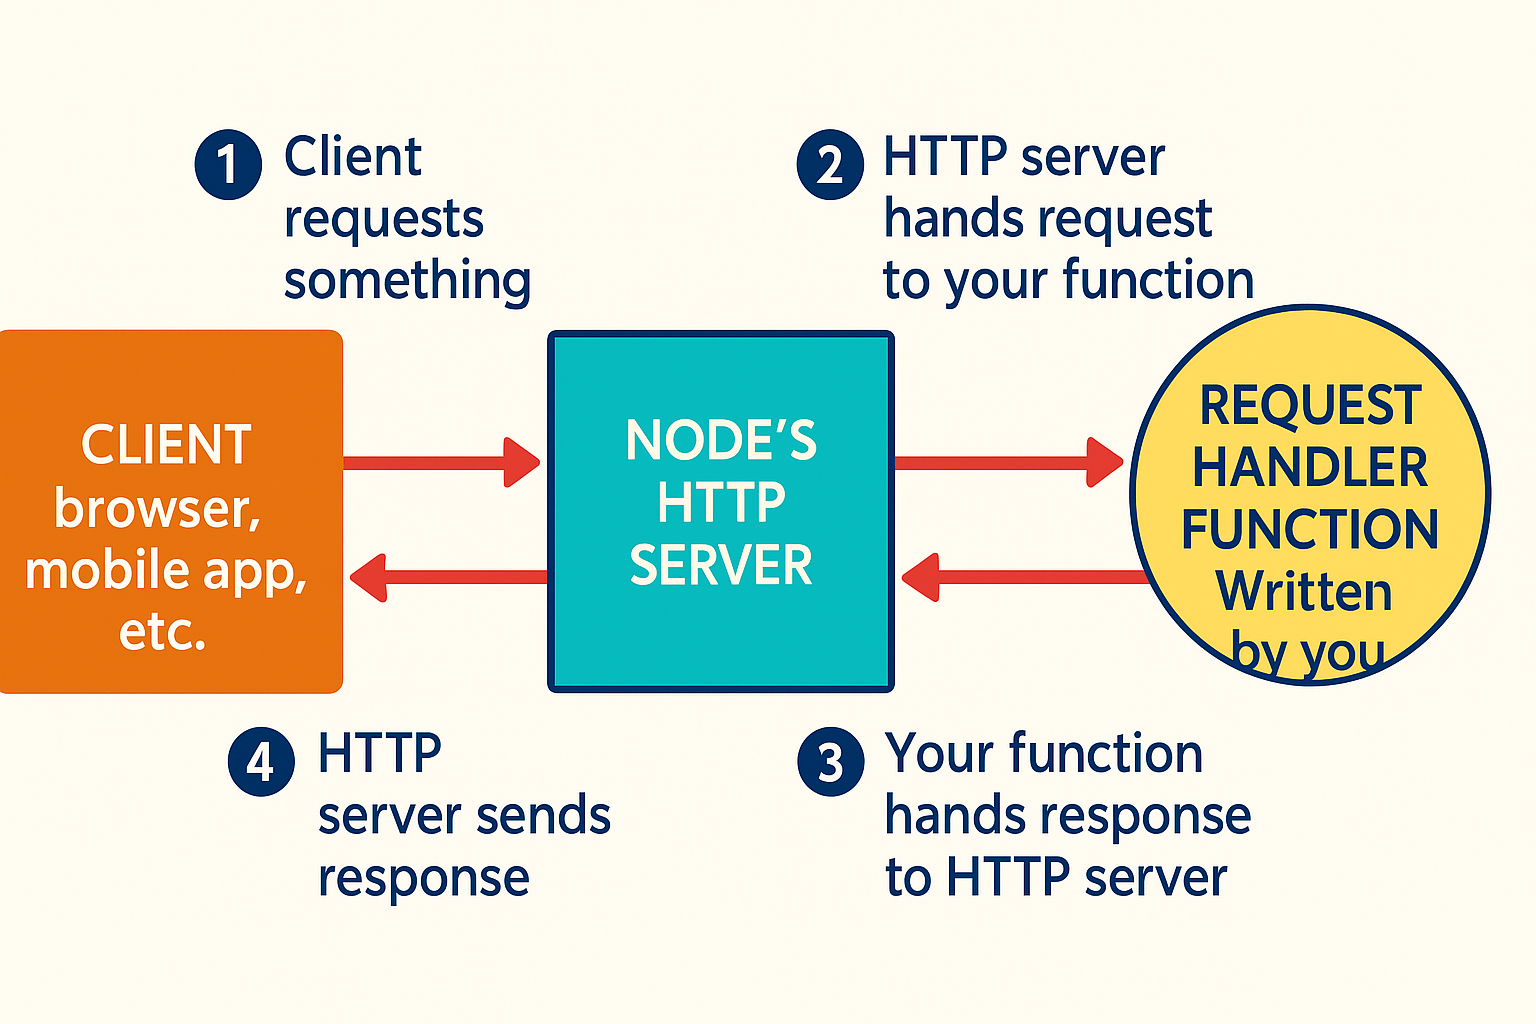
The flow of a request through a Node.js web application. Circles are written by you as the developer; squares are out of your domain.
The function that processes these requests is known as a request handler. It takes the incoming request, determines the appropriate action, and sends a response. While this function is just a regular JavaScript function, Node.js’s built-in HTTP server manages the connection between the client and your function, eliminating the need to handle complex network protocols.
Handling Requests in Node.js
In a Node.js application, the request handler function takes two arguments: a request object (representing the incoming request) and a response object (used to send a reply).
For example, in a login application, the function can check the requested URL— if the homepage is requested, it responds with an HTML page containing the login form; otherwise, it returns a 404 error.
Every Node.js application follows this pattern, where a single function processes incoming requests and sends appropriate responses, making the concept straightforward.
Why Use Express?
While Node.js provides a powerful HTTP server, its APIs can be complex. Simple tasks, like serving a JPEG file, can take dozens of lines of code.
If you want reusable HTML templates, you have to build the functionality yourself. Node.js lacks many features needed for real-world web applications.
Express was created to simplify web development with Node.js, making it easier to build applications efficiently.
What Express Brings to Node.js
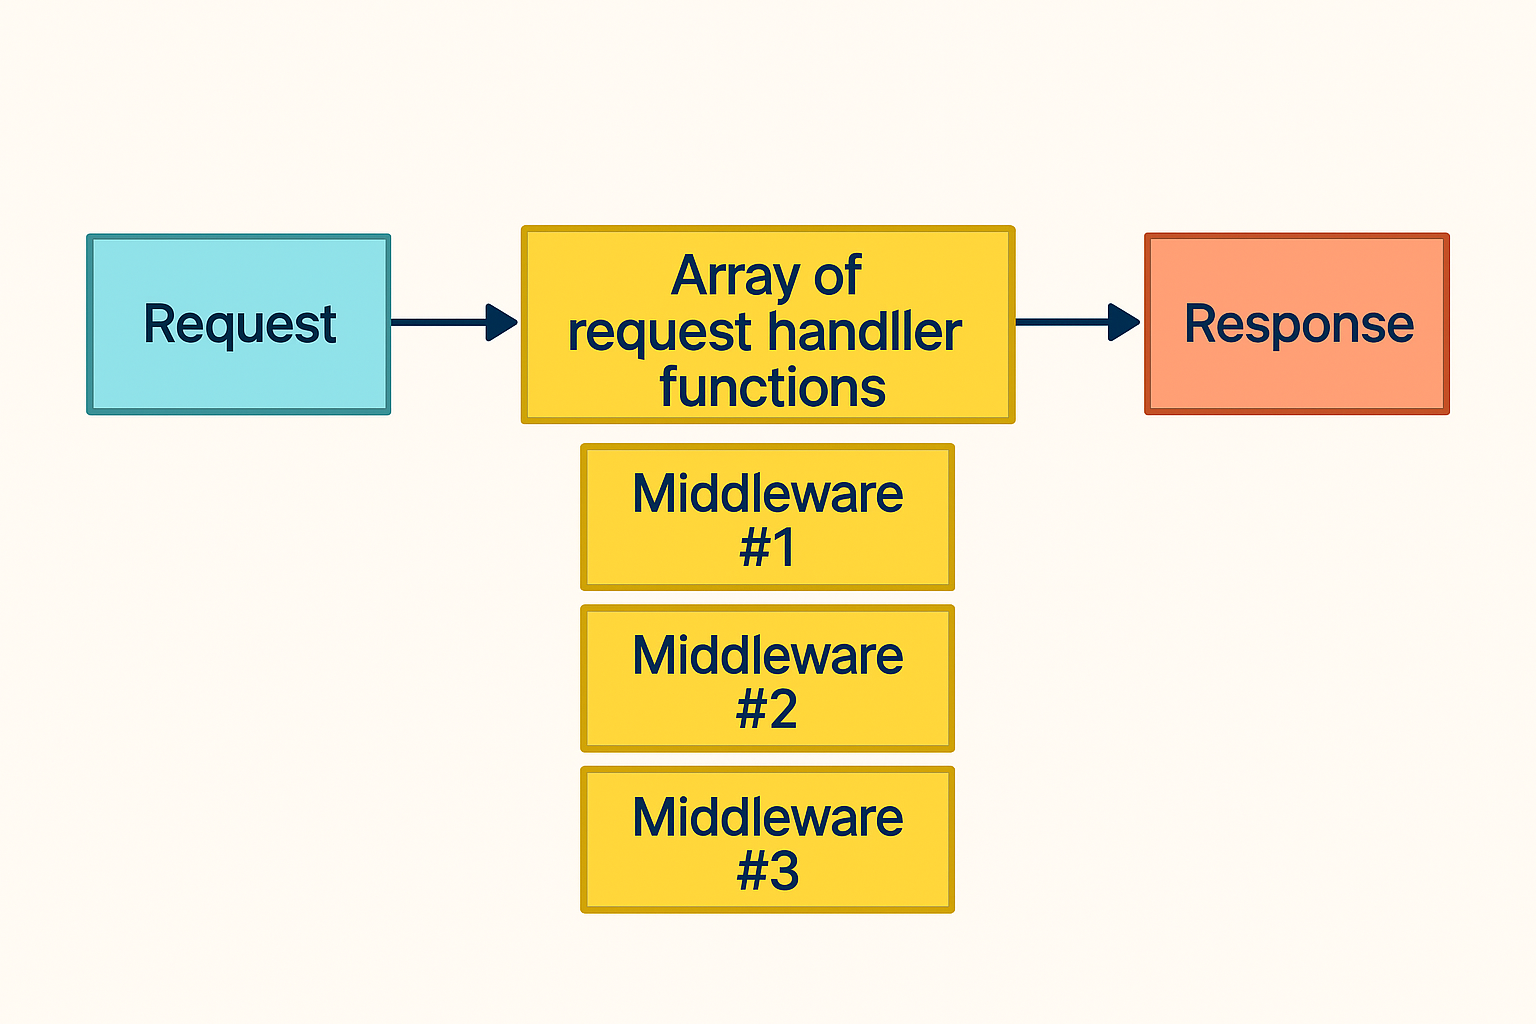
In contrast to Request Handling in Node.js without Express, below figure shows how a request would flow through an Express application
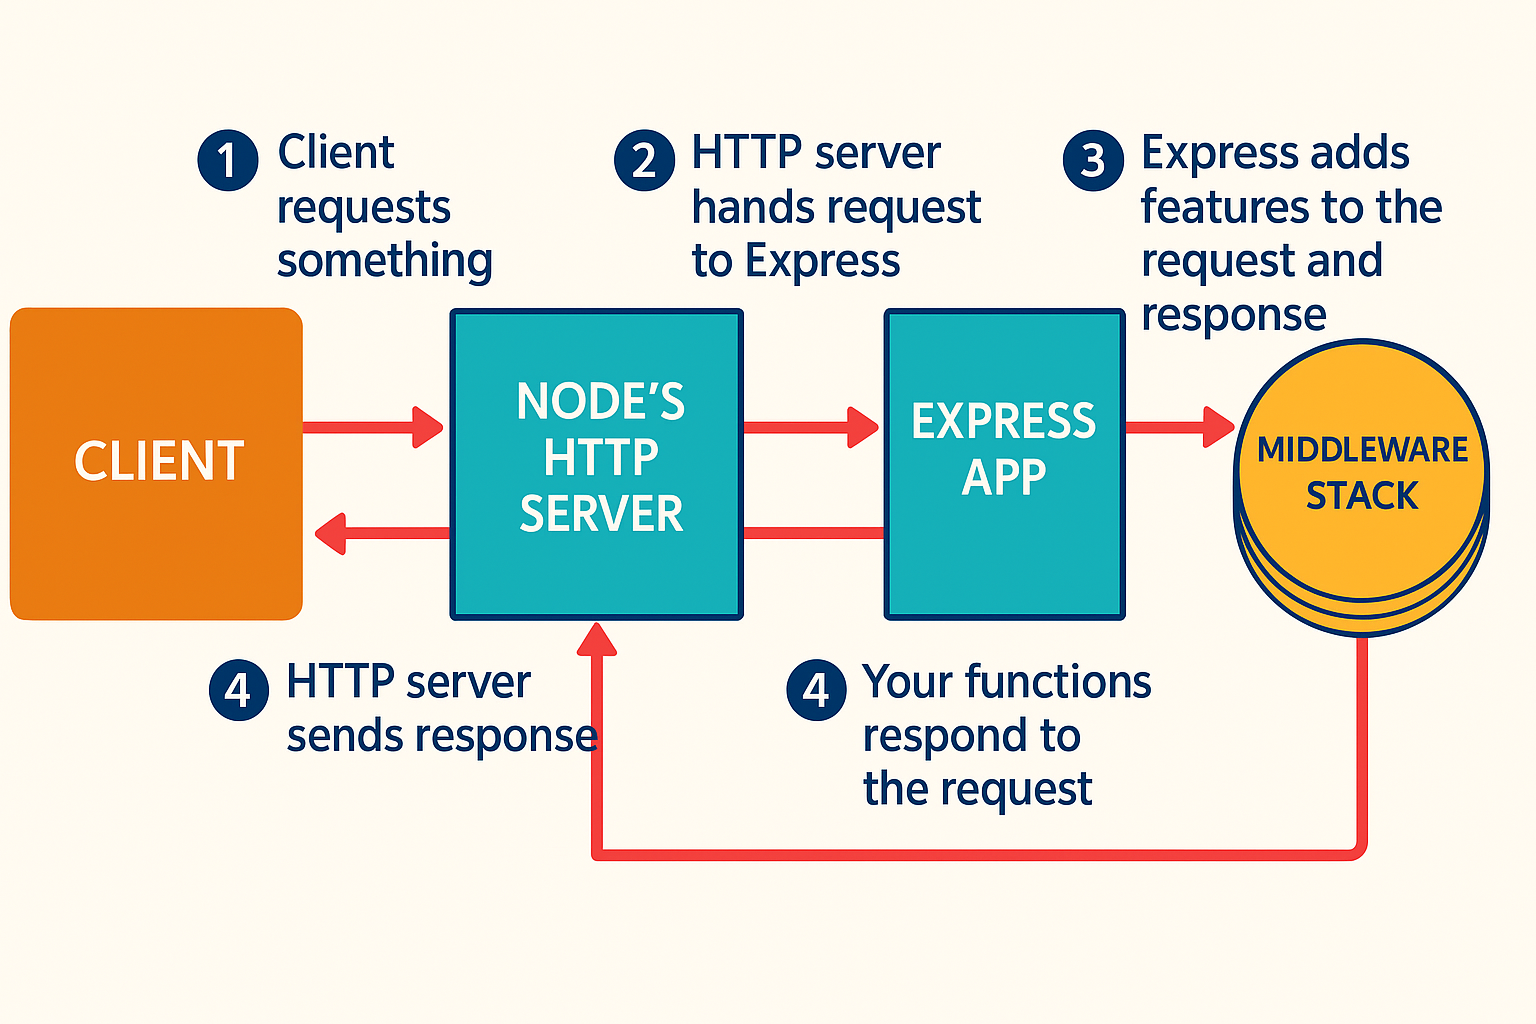
The flow of a request through an Express. Once again, circles are code you write and squares are out of your domain.
How Express Improves Request Handling
Express enhances request handling in two key ways:
- Modular Request Handlers – Instead of a single large function, Express encourages writing multiple smaller functions. Some run on every request (e.g., logging), while others handle specific routes (e.g., homepage or 404 errors). Express provides tools to organize these functions efficiently.
-
Enhanced Request & Response Objects – While Node.js’s HTTP server offers basic functionality,
Express extends it with features like easy access to the client’s IP address and improved URL parsing.
The response object is also enhanced with methods like
sendFile, simplifying complex tasks that would otherwise require many lines of code.
By breaking down request handling into smaller, more manageable functions and offering a more user-friendly API, Express makes building web applications easier and more efficient.
Core Features of Express
Express simplifies Node.js by adding key features, including middleware, routing, subapplications, and various conveniences.
1. Middleware
One of its most important concepts is middleware, which breaks down request handling into smaller, reusable functions.
In raw Node.js, you have a single request handler function. Middleware, however, allows you to use multiple functions, each handling a specific task, such as logging, authentication, or serving static files.
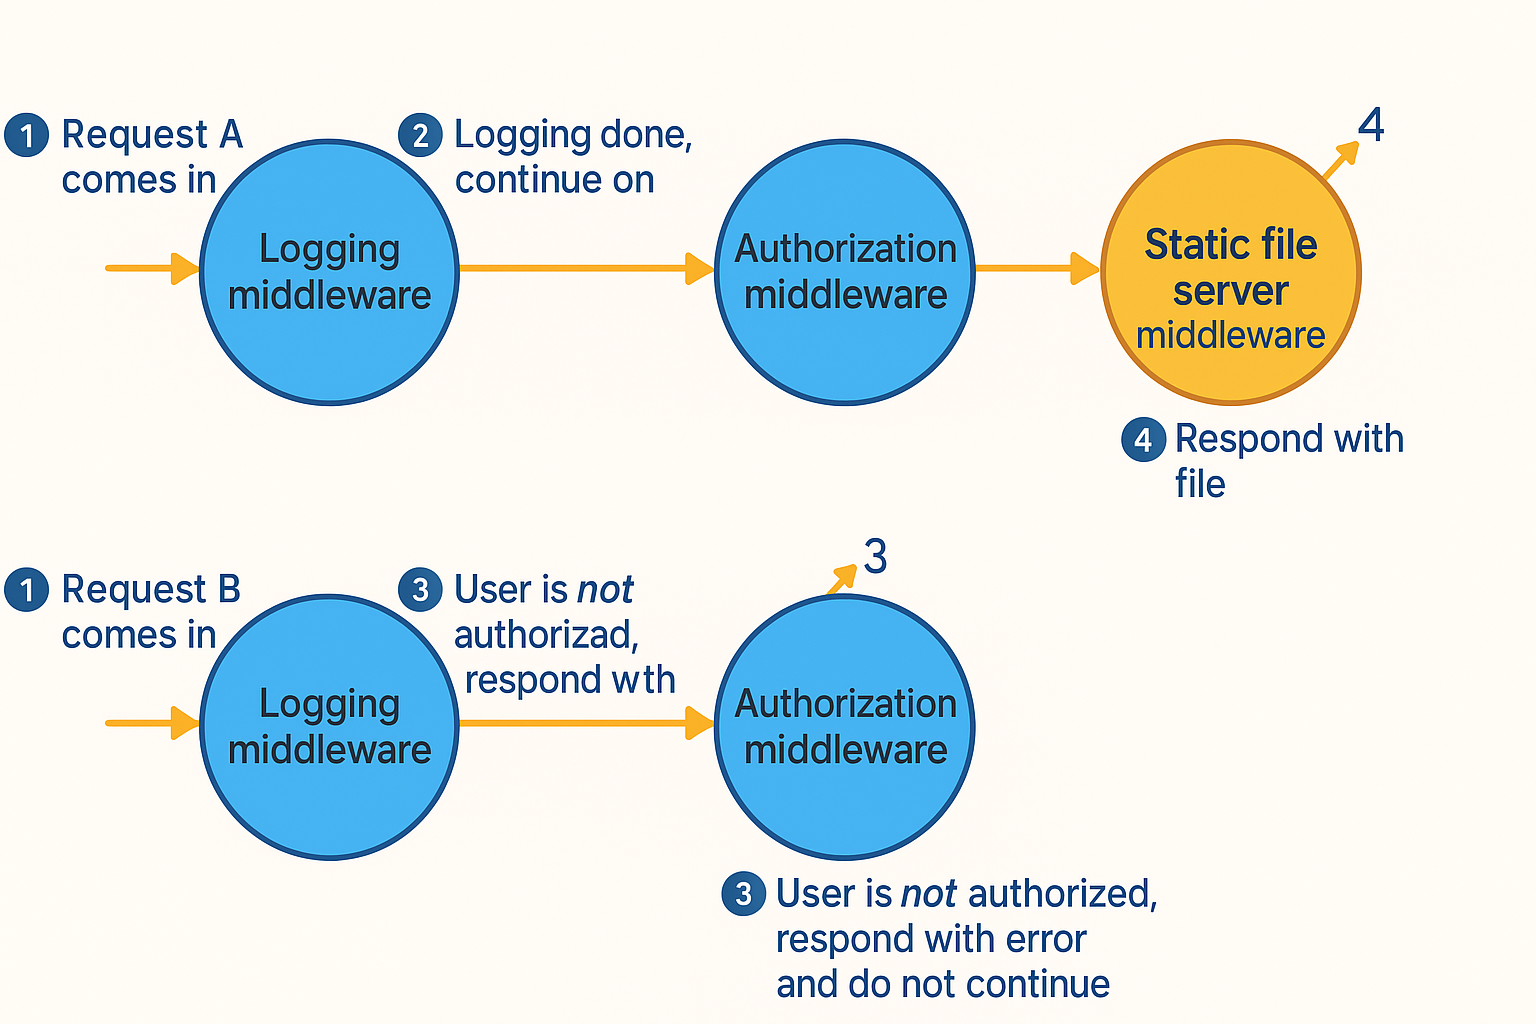
Two requests flowing through middleware functions. Notice that middleware sometimes continues on, but sometimes it responds to requests.
Why Middleware Matters
Middleware functions are standardized, meaning developers can create and share them. Many third-party middleware solutions exist for tasks like:
- Compiling static assets (e.g., LESS, SCSS)
- Security & authentication
- Parsing cookies & sessions
By using middleware, Express makes it easier to build scalable and maintainable web applications.
2. Routing
Routing in Express is similar to middleware in that it breaks down request handling into smaller functions. However, unlike middleware, routes execute conditionally based on the requested URL and HTTP method.
For example:
- A
GETrequest to the homepage URL should return the homepage. - A
GETrequest to the guestbook URL should return the guestbook page. - A
POSTrequest to the guestbook URL should update the guestbook with a new comment.
Each route is handled by a separate request handler function, making the application more organized and maintainable.
How Routing and Middleware Work Together
Express applications use both middleware and routes:
- Middleware can handle tasks like logging all requests.
- Routes ensure the correct response is sent based on the requested URL.
By combining middleware and routing, Express provides a flexible and efficient way to build web applications.
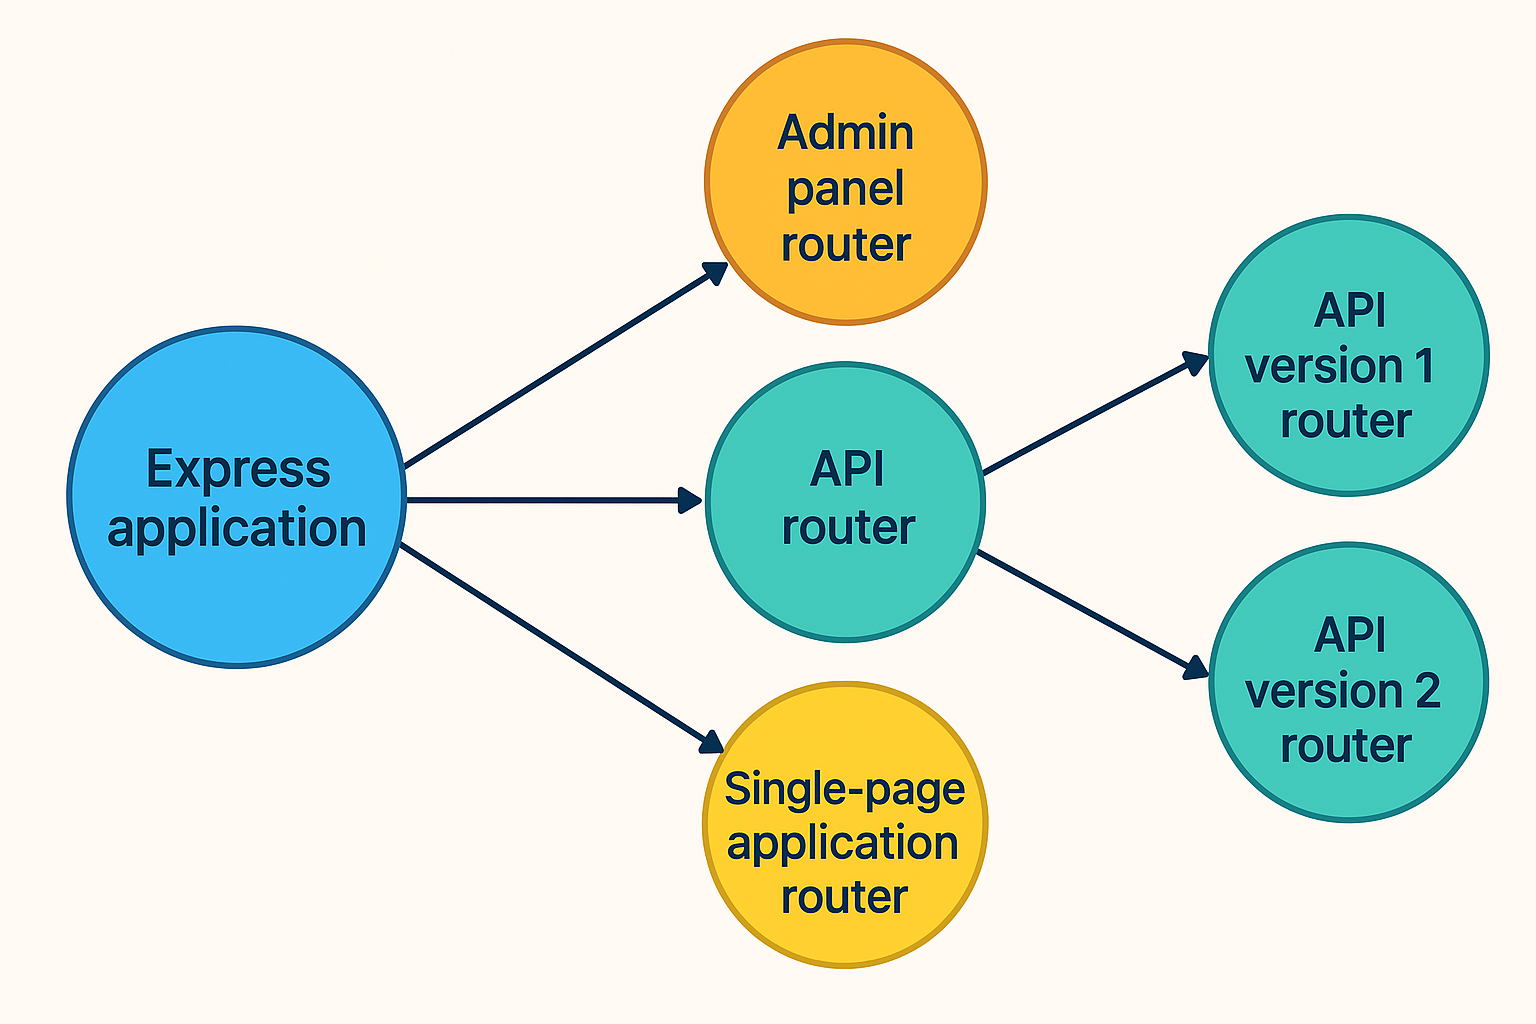
3. Subapplications(Routers)
Express applications can start small, often fitting into a single file. However, as they grow, organizing the code becomes essential. While Express doesn’t enforce a specific structure, it provides a powerful feature to help manage larger projects: subapplications, also known as routers.
What Are Subapplications (Routers)?
Routers in Express function like mini-applications within the main app. They help compartmentalize functionality, making the code more manageable.
For example:
- An admin panel might have its own routes and middleware separate from the main application.
- Instead of mixing admin routes with the rest of the app, you can create an admin router and use it within the main application.
Why Use Routers?
While subapplications may not be necessary for small projects, they become invaluable as the application grows. They provide:
- Better organization – Keeping related routes and logic together.
- Easier maintenance – Making it simpler to update or modify parts of the app.
- Improved scalability – Allowing different parts of the app to function independently.
By using routers, Express helps developers build scalable and well-structured applications.
4. Conveniences in Express
Since Express applications rely on middleware and routes, you’ll frequently write request handler functions. To make this easier, Express provides several built-in conveniences that simplify common tasks.
How Express Makes Development Easier
In raw Node.js, handling requests can be complex and require many lines of code. Express simplifies this by offering:
- Simplified File Handling – Serving a JPEG file takes multiple steps in Node.js, but with Express, it's just one call to
sendFile(). - Easier HTML Rendering – Express provides tools for rendering HTML, while Node.js lacks built-in support for this.
- Enhanced Request Parsing – Express makes it easy to extract details from incoming requests, such as the client’s IP address or query parameters.
Why These Features Matter
Unlike middleware, routing, or subapplications, these conveniences don’t change how an application is structured. However, they reduce complexity, making Express more efficient and developer-friendly.
1. Middleware
The http module in Node.js lets you create web servers, but it’s very basic and requires a lot of manual work.
Express is a third-party module that simplifies this process by adding powerful features and reducing boilerplate code.
One of Express's key features is middleware—functions that process incoming requests in a sequence. Middleware helps perform tasks like logging, modifying request/response data, or setting headers before the final response is sent.
Instead of handling everything in one large function, Express lets developers break logic into smaller, reusable middleware functions, making code cleaner and easier to maintain.
The concept of middleware was inspired by Ruby’s Rack framework, which also provided a modular interface.
Express also makes writing basic applications, like "Hello World", faster and less error-prone by handling the complexity behind the scenes.
Setting Up a Simple Express Project
To build a Hello World app with Express, start by creating a new project directory and setting up a package.json file.
This file stores important details about your project, such as its name, author, and dependencies.
Step 1: Create a New Project Folder
> mkdir my-express-app
> cd my-express-app
Step 2: Initialize package.json
Create a basic package.json file manually:
{
  "name": "my-express-app",
  "author": "Laxmi",
  "private": true,
  "dependencies": {}
}
Or generate one automatically using:
npm init -yStep 3: Installing Express and Updating package.json
To add Express to your project, run:
npm install expressThis will:
- ✅ Download the latest version of Express from the Node.js package registry
- ✅ Store it in the
node_modulesfolder - ✅ Automatically add Express as a dependency in your
package.json
After installation, your package.json will look like:
{
  "name": "hello-world",
  "author": "Laxmi",
  "private": true,
  "dependencies": {
    "express": "^5.1.0"
  }
}
Now, you're ready to start building with Express!
A minimal Express application
Save this below file into app.js
var express = require('express'); // Import Express
var app = express();              // Create an Express application

app.listen(3000);                 // Starts the server
When you start the server and send it an HTTP request (using curl or a web browser),
you’ll see the message “Cannot GET /” indicating that this application isn’t yet configured to handle
the requested URL.
This is the first example of how Express’s middleware flow works—it invokes each attached middleware component or route handler in the order they were added. If none of them handle the request, Express automatically responds with a 404 Not Found.
Now that you’ve seen how to create a bare-bones Express app and understand how the middleware flow works, let’s take a look at how you can make the application actually do something by defining and adding middleware or route handlers.
Writing Hello World Middleware in Express
Suppose you want to send a simple response to every request that comes into your server.
To do this, you’d create a function, which we’ll call hello, that accepts the
request and response objects.
In this case, you’ll use res.setHeader() to set the response type and
res.end() to send a plain text message like "hello world".
Once a response is sent, no further middleware will be called.
Example Code
const express = require('express');   // Import Express

const app = express();               // Create an Express app

// Hello World Middleware
function hello(request, response) {
  response.setHeader('Content-Type', 'text/plain');
  response.end('hello world');
}

app.use(hello);                      // Use the hello middleware

app.listen(3000);                    // Starts the server
Breaking It Down
- Requiring Modules: First, we import Express. (Note: Express internally uses Node’s http module, so we don’t need to import it manually here).
- Creating the App: Instead of manually creating an HTTP server, we call
express(), Callingexpress()gives you an app object that can handle HTTP requests and lets you define routes and middleware. Internally, it works like a request handler and can be used directly with an HTTP server. - Using Middleware: The
app.use()method registers the hello middleware, which handles every incoming request by setting the Content-Type and sending a "hello world" response. Because it ends the response, no further middleware is called.. - Starting the Server:
app.listen(3000);starts the HTTP server on port 3000.
Express wraps the low-level Node.js http module for you, so when you call app.listen(...).
It actually does:
const http = require('http');
http.createServer(app).listen(...);
under the hood.
It’s a helper method that integrates with the built-in HTTP server creation, making the code cleaner and more readable.
Now, your Express app is ready to handle requests!
Understanding Middleware Function Signature in Express
Every middleware function in Express follows a specific structure, taking three arguments
function(request, response, next) {
  // Middleware logic here
}
But not every middleware needs the next parameter. If a middleware sends a complete response, like in the example below, it doesn’t need to call next() or include it in the parameters.
- request (req): Represents the incoming HTTP request. You can access things like headers, query parameters, and the request body using this object.
- response (res): Represents the outgoing HTTP response. It’s used to send data back to the client — for example, using res.end(), res.send(), or res.json().
- next (optional): This function is used to pass control to the next middleware in the chain. If your middleware doesn't end the request (by sending a response), you must call next() to avoid hanging the request.
How Middleware Works at a High Level
In a traditional Node.js HTTP server, every request is processed by one master function.
function requestHandler(req, res) {
  console.log("Incoming request to: " + req.url);
  res.end("Hello, world!");
}
This function handles everything—from processing the request to generating the response. The flow of your application looks something like this:

- Client sends a request to the server.
- The single request handler receives the request.
- It performs all necessary operations (logging, authentication, data processing, etc.).
- It sends the final response back to the client.
The Problem Without Middleware
Without middleware, you rely on a single request handler to manage everything. While this handler can call other functions, it remains the central control point for all incoming requests.
If you were to visualize this approach, every request would pass through one large function, which decides how to respond. This can quickly become complex and difficult to manage as your application grows.
As the number of responsibilities handled by the main function increases, the code becomes harder to read, maintain, and debug.
How Middleware Improves Request Handling
Instead of passing each request through a single function, Express uses a middleware stack—an array of functions that execute in sequence.
When a request comes in, it moves through multiple middleware functions, each handling a specific task before passing control to the next function.
It might look like the figure below:
Middleware components are powerful because they are typically small, self-contained, and reusable across multiple applications. Let us enhance the bare-bones Express application from the previous section with two simple middleware layers:
- A logger middleware component to log incoming requests to the console
- A hello middleware component to respond to the request with “hello world”
Let’s start by creating a simple middleware function that logs each request coming into the server.
Middleware that Does Logging in Express
Suppose you want to create a log that records the request method and URL of requests coming in to your Express server. To do this, you’d define a function, which we’ll call logger, that accepts the request and response objects, along with the next callback function.
The next function is called from within the middleware to indicate that it has completed its work and control should be passed to the next middleware in the stack. This mechanism supports asynchronous operations and allows Express to handle the flow between middleware components effectively.
For the logger middleware, you can use console.log() to print the HTTP request method and URL, and then call next() to continue to the next middleware function. Here's how the logger middleware function looks:
// Logger Middleware
function logger(req, res, next){
  console.log('%s %s', req.method, req.url);
  next();
}
This is a valid middleware component that logs each request to the console and then allows the application to continue processing.
After starting your server and sending a few HTTP requests (using a browser or curl), you’ll see output similar to the following in your terminal:
GET /
GET /favicon.ico
GET /users
GET /user/1
Logging requests is just one layer of middleware. In order to respond to the client, you’ll still need to define another middleware component.
Middleware that Responds with “hello world”
The second middleware component in this application will send a response to the HTTP request. It's similar to the "hello world" server example found on the Node.js homepage:
// Hello World Middleware
function hello(req, res) {
  res.setHeader('Content-Type', 'text/plain');
  res.end('hello world');
}
You can use this second middleware function with your Express app by calling the
app.use() method. This method can be called multiple times to stack
middleware components.
The following example shows how to build a small Express application that first logs incoming requests and then responds to every request with “hello world.”
Using Multiple Express Middleware Components
var express = require('express');
var app = express();

// Logger Middleware
function logger(req, res, next) {
  console.log('%s %s', req.method, req.url);
  next();
}

// Hello World Middleware
function hello(req, res) {
  res.setHeader('Content-Type', 'text/plain');
  res.end('hello world');
}

app.use(logger);
app.use(hello);

app.listen(3000);
In this case, the hello middleware component does not include the
next callback argument. This is because it completes the HTTP response
and does not need to pass control to any additional middleware. For middleware like this,
omitting the next argument is completely valid.
This design is convenient because it matches the structure of a typical callback function
used with http.createServer, meaning you can reuse simple HTTP server functions
as middleware in your Express application.
Note that app.use() returns the Express app instance, so you can chain multiple
calls like this:
express()
  .use(logger)
  .use(hello)
  .listen(3000);
However, chaining is not required. The following approach is equally valid:
var app = express();
app.use(logger);
app.use(hello);
app.listen(3000);
Now that you have a basic “hello world” Express app running with two middleware components,
you can begin to explore how the order of app.use() calls impacts the behavior
of your application. Strategic ordering can help you shape request handling flow effectively.
Why Middleware Ordering Matters in Express
Express gives you full control over the order in which middleware functions are executed. This makes it a very flexible tool for web development. However, it's important to understand how middleware ordering affects application behavior.
1. Middleware That Calls next()
The following example shows how one middleware passes control to the next using next():
const express = require('express');
const app = express();

// Middleware 1: Logs method and URL
app.use((req, res, next) => {
  console.log(`${req.method} ${req.url}`);
  next(); // Pass control to the next middleware
});

// Middleware 2: Sends response
app.use((req, res) => {
  res.end('Hello World');
});

app.listen(3000);
Output:
GET /The browser displays: Hello World
2. Middleware That Does Not Call next()
If a middleware does not call next(), the chain stops, and later middleware won’t run:
app.use((req, res) => {
  res.end('Stopped here');
});

app.use((req, res) => {
  // This will never run
  console.log('This will not be reached');
});
3. Middleware for Authentication
Middleware ordering is important for features like authentication:
// Auth middleware
app.use((req, res, next) => {
  const authorized = req.headers.authorization === 'secret';
  if (!authorized) {
    return res.status(401).send('Unauthorized');
  }
  next(); // Proceed if authorized
});

// Protected route
app.use('/dashboard', (req, res) => {
  res.send('Welcome to your dashboard');
});
If the auth middleware is defined after the route, it won't protect it!
✅ Takeaways:
- Middleware runs in the order it's defined.
- If a middleware does not call
next(), the chain ends. - Use ordering wisely for logging, parsing, authentication, and routing.
A File Server with Logging and Authentication
This example demonstrates how an Express app can be structured using middleware to build a simple file server that authenticates users and logs requests. The app only serves static files if the user provides a valid authentication token.
Let us explore the role of middleware in a layered manner, demonstrating how each middleware contributes to the application logic.
The Structure and Purpose of the Application
This Express application listens on port 3000 and serves files from the public directory. However, it only does so after logging every request and ensuring the user is authenticated. If the user provides the correct authentication token, they are allowed to access static resources like HTML files. If the authentication fails or if the requested file does not exist, the appropriate error message is returned.
The application consists of four key middleware components::
- Logger middleware for logging HTTP methods and URLs.
- An authentication middleware that checks for a valid token.
- A custom static file serving middleware.
- A fallback middleware for handling 404 errors.
The order in which these middleware components are registered is vital to the behavior of the application.
Logger Middleware: Tracking Every Request
The first middleware registered using app.use() is a simple logger. This function is invoked for every incoming request, regardless of what the client is asking for. The logger prints out the HTTP method and the requested URL, such as GET /index.html.
app.use((req, res, next) => {
  console.log(`[Logger] ${req.method} ${req.url}`);
  next();
});
The call to next() is essential—it hands off control to the next middleware in the stack. Without this, the request would stall and never proceed further, resulting in a timeout. Because this middleware does not interfere with the response, it is safe to place it at the top of the middleware stack to ensure logging for all types of requests, including successful requests and errors.
Authentication Middleware: Controlling Access
After logging, the application introduces the authentication middleware, which checks whether the user is allowed to access the server’s resources. The client must include a special header: Authorization: secret-token. This acts as a simple authentication mechanism.
function controlledAccess(req, res, next) {
  const token = req.headers['authorization'];

  if (token === 'secret-token') {
    console.log('[Auth] Access granted');
    next();
  } else {
    console.log('[Auth] Access denied');
    res.statusCode = 401;
    res.end('Unauthorized: Invalid or missing token');
  }
}

app.use(controlledAccess);
If the token is correct, the middleware calls next(), allowing the request to proceed to the static file server. If not, it sends back a 401 Unauthorized response and does not call next(), effectively halting further middleware execution. This approach ensures that unauthorized users can never access any static content or reach any other middleware defined after this point.
Importantly, this middleware must come after the logger and before the static file handler to function correctly. Placing it elsewhere would result in security flaws—for example, if the static files were served before authentication, anyone could access them without restriction.
Static File Serving Middleware: Reading and Responding with Files
Once the request passes the logger and authentication, it reaches the custom static file middleware. This middleware is responsible for reading the requested file from the disk and serving it to the client. The file is retrieved from a directory named public, relative to the project’s root directory..
The middleware determines the actual file path based on the request URL. If the URL is /, it defaults to serving index.html. For other URLs like /about.html, it attempts to read that specific file.
function serveStaticFiles(req, res, next) {
  const filePath = path.join(__dirname, 'public', req.url === '/' ? 'index.html' : req.url);

  fs.readFile(filePath, (err, data) => {
    if (err) {
      console.log('[Static] File not found, passing to next');
      next();
    } else {
      console.log('[Static] Serving file:', filePath);
      res.statusCode = 200;
      res.end(data);
    }
  });
}

app.use(serveStaticFiles);
If the file is found, it is served immediately and the response ends. If not, the middleware logs the failure and passes control to the next handler using next(). This is a critical design, as it enables the application to handle 404 errors gracefully instead of simply failing or crashing when a file is not found.
Fallback Middleware: Handling 404 Errors
The final middleware in the stack is the fallback or catch-all handler. It serves one purpose: to respond with a 404 Not Found error for any request that was not handled by the previous middleware.
This includes cases where:
- The file requested does not exist.
- The user is unauthorized but still tried to access a file.
- An invalid URL is entered.
app.use((req, res) => {
  res.statusCode = 404;
  res.end('404 Not Found: Resource does not exist');
});
Because this middleware does not call next(), it terminates the request-response cycle. It's crucial that this be placed at the very end of the middleware stack, otherwise, it might prematurely interfere with legitimate requests.
The Importance of Middleware Order
The order of middleware registration is crucial, the sequence in which middleware is applied in an Express application directly influences the behavior of the entire system. Middleware that calls next() allows control to flow to subsequent middleware. Those that do not (such as our auth middleware on failure, or static file server when a file is found) effectively end the flow.
In our application:
- The logger should come first to log every request.
- Authentication must follow to prevent unauthorized access.
- The static file server comes afterward to serve content only to authenticated users.
- Finally, the fallback handler catches anything that was not addressed by the earlier middleware.
If, for example, the static file middleware was registered before authentication, it would serve files without checking if the user is authenticated. Similarly, if the fallback handler were registered earlier, it could interfere with legitimate requests that just needed more time to resolve.
If any middleware that does not call next() appears before another that should handle the request.
Complete Application Code
const express = require('express');
const fs = require('fs');
const path = require('path');

const app = express();
const PORT = 3000;

// Logger Middleware
app.use((req, res, next) => {
  console.log(`[Logger] ${req.method} ${req.url}`);
  next();
});

// Authentication Middleware
function restrictFileAccess(req, res, next) {
  const token = req.headers['authorization'];
  if (token === 'secret-token') {
    console.log('[Auth] Access granted');
    next();
  } else {
    console.log('[Auth] Access denied');
    res.statusCode = 401;
    res.end('Unauthorized: Invalid or missing token');
  }
}
app.use(restrictFileAccess);

// Static File Middleware
function serveStaticFiles(req, res, next) {
  const filePath = path.join(__dirname, 'public', req.url === '/' ? 'index.html' : req.url);
  fs.readFile(filePath, (err, data) => {
    if (err) {
      console.log('[Static] File not found, passing to next');
      next();
    } else {
      console.log('[Static] Serving file:', filePath);
      res.statusCode = 200;
      res.end(data);
    }
  });
}
app.use(serveStaticFiles);

// Fallback Middleware
app.use((req, res) => {
  res.statusCode = 404;
  res.end('404 Not Found: Resource does not exist');
});

// Start Server
app.listen(PORT, () => {
  console.log(`Server is running at http://localhost:${PORT}`);
});
Conclusion
This example clearly demonstrates the power of Express middleware and the importance of middleware ordering. Each component plays a specific role in the flow of a request, and understanding how they interact is key to building secure, efficient, and organized Express applications.
Folder Structure
The application should follow a simple folder structure. Here's how it should look:
express-middleware-app/
├── app.js
├── package.json
└── public/
    ├── index.html
└── about.htmlapp.js: The main Express application file that contains all middleware logic.package.json: The project file that manages dependencies (created usingnpm init).public/: A directory that contains static HTML files to be served.
Steps to Run the Application
1. Create the Project Folder
Open your terminal and create a new directory:
mkdir express-middleware-app
cd express-middleware-app
2. Initialize the Project
Run the following command to generate a package.json file:
npm init -y3. Install Express
Install Express.js using npm:
npm install express4. Create the Files
Create the following files and folders:
app.js– Copy the full Express application code here.public/index.html– A basic HTML file to serve when visiting/.public/about.html– Another sample file (optional).
Example index.html
<!DOCTYPE html>
<html>
<head><title>Home</title></head>
<body>
  <h1>Welcome to the Home Page</h1>
</body>
</html>
5. Start the Server
In the terminal, run the following command to start the server:
node app.jsYou should see output like:
Server is running at http://localhost:30006. Test the Application
Open your browser and visit:
http://localhost:3000/– You will see a 401 Unauthorized unless you provide the right header.
To test authorized access, use a tool like Postman or curl:
Using curl:
curl -H "Authorization: secret-token" http://localhost:3000/
This should return the contents of index.html if everything is set up correctly.
Express built-in and third-party middleware
You learned what middleware is, how to create it, and how to use it with Express. But Express’s real power comes from its rich ecosystem of built-in and third-party middleware, which addresses many common web application needs—such as session management, cookie parsing, body parsing, request logging, and much more. This middleware ranges in complexity and provides a powerful foundation for building simple web servers as well as more sophisticated, full-featured web applications and frameworks.
In the world of web development, middleware plays a pivotal role in controlling the flow of an HTTP request and response cycle. Express, one of the most widely used web frameworks for Node.js, heavily relies on middleware to handle various tasks ranging from parsing request bodies to managing sessions, logging, authentication, error handling, and serving static assets.
Middleware in Express is essentially a function that has access to the request object (req),
the response object (res), and the next() function in the application’s request-response cycle.
It can perform operations such as executing any code, modifying the request and response objects, ending the request-response
cycle, or calling the next middleware in the stack.
Built-in Middleware
| Middleware | Description |
|---|---|
express.static |
Serves static assets such as HTML files, images, and stylesheets. It acts as a file server mapped to a public directory. |
express.json |
Parses incoming requests with JSON payloads and makes the data available in req.body. Available since Express 4.16.0. |
express.urlencoded |
Parses incoming requests with URL-encoded payloads (from HTML forms) and populates req.body. |
Officially Supported Third-party Middleware
| Middleware | Description |
|---|---|
body-parser |
Parses JSON, URL-encoded, and other request body types into JavaScript objects in req.body. |
compression |
Compresses HTTP responses using gzip/deflate to improve performance and reduce bandwidth usage. |
connect-timeout |
Imposes a time limit on HTTP requests, terminating them if they exceed the allowed duration. |
cookie-parser |
Parses the Cookie header and populates req.cookies and optionally req.signedCookies. |
cookie-session |
Implements session management using client-side cookies to store session data. |
csurf |
Protects against Cross-Site Request Forgery attacks by generating and validating CSRF tokens. |
errorhandler |
Used in development to display detailed error messages and stack traces to the client. |
express-session |
Enables server-side session management and provides a persistent req.session object. |
method-override |
Allows overriding HTTP methods using a query parameter or hidden form field (e.g., from POST to PUT). |
morgan |
Logs HTTP requests in various formats such as combined, common, short, or dev for debugging and monitoring. |
response-time |
Measures and records the time taken to handle a request and adds it as a response header. |
serve-favicon |
Serves the site’s favicon efficiently and prevents it from appearing in the request logs. |
serve-index |
Generates a browsable directory listing for a specified folder on the server. |
serve-static |
Serves static files such as images, documents, and styles from a specified directory. |
vhost |
Implements virtual hosting by routing requests to different middleware or apps based on hostname. |
Additional Popular Middleware Modules
| Middleware | Description |
|---|---|
helmet |
Helps secure Express apps by setting various HTTP headers to protect against common vulnerabilities. |
passport |
Provides an extensible set of authentication strategies, including username/password, OAuth, OpenID, and more. |
Express Middleware-Based File Server
In this version, we replace the custom middleware with built-in/officially supported middleware.
Used Middleware:
- morgan - HTTP request logger
- express-jwt - Auth middleware to validate JWT tokens
- express.static - Built-in middleware to serve static files
- Error handler - Final catch-all for 404 and internal errors
Installation Instructions
npm install express morgan express-jwt jsonwebtokenApplication Code
const express = require('express');
const morgan = require('morgan');
const { expressjwt: jwt } = require('express-jwt');
const path = require('path');

const app = express();
const PORT = 3000;

// JWT Secret Key
const secretKey = 'my-secret-key';

// 1. Logger Middleware using morgan
app.use(morgan('dev'));

// 2. Authentication Middleware using express-jwt
app.use(
  jwt({
    secret: secretKey,
    algorithms: ['HS256']
  }).unless({ path: ['/favicon.ico'] }) // allow favicon request without token
);

// 3. Static File Serving using express.static
app.use(express.static(path.join(__dirname, 'public')));

// 4. 404 Fallback Middleware
app.use((req, res) => {
  res.status(404).send('404 Not Found: Resource does not exist');
});

// 5. Error Handling Middleware for express-jwt
app.use((err, req, res, next) => {
  if (err.name === 'UnauthorizedError') {
    res.status(401).send('Invalid or missing token');
  } else {
    res.status(500).send('Internal Server Error');
  }
});

// 6. Start Server
app.listen(PORT, () => {
  console.log(`Server running at http://localhost:${PORT}`);
});
Summary
This implementation uses express-jwt to streamline token-based authentication.
It validates JWTs automatically, reducing the need for repetitive code and improving security.
Proper error handling ensures that unauthorized or malformed requests receive appropriate feedback.
Instructions to Run above Express App
📁 Project Folder Structure
express-jwt-app/
├── app.js               # Main Express app
├── generateToken.js     # Script to generate JWT token
├── package.json         # Node.js project metadata
├── package-lock.json    # Dependency lock file
└── public/              # Public folder to serve static files
    └── index.html       # Sample static HTML file
    └── about.html       # Sample static HTML file
1. Create the project folder
mkdir express-jwt-app
cd express-jwt-app
2. Initialize a Node.js project
npm init -y3. Install required dependencies
npm install express morgan express-jwt jsonwebtoken4. Create project files
- Create a file named
app.jsand paste your Express code into it. - Create a
publicdirectory and add an HTML file.
mkdir public
echo "<h1>Hello, JWT Protected World!</h1>" > public/index.html
5. Generate a JWT Token
Create a file generateToken.js with the following content:
const jwt = require('jsonwebtoken');
const token = jwt.sign({ user: 'admin' }, 'my-secret-key', { algorithm: 'HS256' });
console.log('Your JWT token:\\n');
console.log(token);
Then run:
node generateToken.jsCopy the token from the output.
6. Start the Express server
node app.jsYou should see:
Server running at http://localhost:30007. Access the Server with a Token
Use curl or Postman to send a request with the token:
Using curl:
curl -H "Authorization: Bearer <your-token-here>" http://localhost:3000/Replace <your-token-here> with the token you copied.
Without a token:
curl http://localhost:3000/You’ll receive:
Invalid or missing tokenExpress.js Routing
In this tutorial, we'll learn how to use routing in Express to build a more interactive server application.
We'll enhance our previous static file server by adding custom routes like /, /about, /api/public, and /api/private,
demonstrating how to handle both open and protected routes using JWT middleware.
📁 Folder Structure
express-middleware-app/
├── public/
│   ├── index.html
│   └── about.html
├── app.js
├── package.json
└── package-lock.json
🛠️ What is Routing in Express?
Routing refers to how an application responds to a client request to a particular URL endpoint and HTTP method.
Routes are defined using methods like app.get(), app.post(), app.put(), and app.delete().
Each route specifies:
- HTTP method – GET, POST, etc.
- Path – e.g.,
/login,/api/private - Handler function – Code to execute when the route is matched
JWT Protected Express.js App with Routing
📁 Folder Structure
express-routing-app/
├── public/
│   ├── index.html
│   ├── about.html
│   ├── public.html
│   └── private.html
├── app.js
└── package.json
app.js
const express = require('express');
const morgan = require('morgan');
const { expressjwt: jwt } = require('express-jwt');
const jwtSign = require('jsonwebtoken');
const path = require('path');

const app = express();

const secretKey = 'my-secret-key'; // JWT Secret Key

// Middleware
app.use(morgan('dev'));
app.use(express.json()); // For parsing JSON bodies

// JWT Authentication Middleware (exclude public paths)
app.use(
  jwt({
    secret: secretKey,
    algorithms: ['HS256']
  }).unless({ path: ['/', '/about.html', '/index.html', '/api/public', '/api/login', '/favicon.ico'] })
);

// Serve static files from 'public' directory
app.use(express.static(path.join(__dirname, 'public')));

// Public API route
app.get('/api/public', (req, res) => {
  res.json({ message: 'This is a public endpoint.' });
});

// Private API route (requires JWT)
app.get('/api/private', (req, res) => {
  res.json({ message: 'This is a protected endpoint.', user: req.auth });
});

// Login route (generates a token for testing)
app.post('/api/login', (req, res) => {
  const { username } = req.body;
  if (!username) {
    return res.status(400).json({ error: 'Username is required' });
  }

  const user = { id: 1, username };
  const token = jwtSign.sign(user, secretKey, { algorithm: 'HS256', expiresIn: '1h' });
  res.json({ token });
});

// 404 Fallback
app.use((req, res) => {
  res.status(404).send('404 Not Found: Resource does not exist');
});

// JWT Error Handling
app.use((err, req, res, next) => {
  if (err.name === 'UnauthorizedError') {
    res.status(401).send('Invalid or missing token');
  } else {
    res.status(500).send('Internal Server Error');
  }
});

// Start Server
app.listen(3000, () => {
  console.log("Server running at http://localhost:3000");
});
🚀 Execution Instructions
- Open your terminal or command prompt.
- Create the project folder:
mkdir express-routing-app cd express-routing-app - Initialize Node.js project:
npm init -y - Install required dependencies:
npm install express morgan express-jwt jsonwebtoken - Create the
public/folder and add HTML files like:<!-- public/index.html --> <!DOCTYPE html> <html> <head><title>Home</title></head> <body> <h1>Welcome to the Home Page</h1> </body> </html> - Create
app.jsand paste the full Express code from above. - Run the server:
node app.js
Testing Instructions
1. Public Pages
To access the static public pages (HTML files), open your browser and navigate to the following URLs:
- Home Page:
http://localhost:3000/index.html - About Page:
http://localhost:3000/about.html
2. Public API Endpoint
The public API endpoint does not require authentication. You can access it by making a GET request to:
- Public API:
GET http://localhost:3000/api/public
This will return a simple JSON message indicating that it is a public endpoint.
3. Login to Get JWT Token
The login endpoint is used to generate a JWT (JSON Web Token) for authenticating requests to protected routes.
To test it:
- Use a tool like Postman or curl to send a
POSTrequest to/api/loginwith the following JSON body:
{
    "username": "john"
}
For example
curl -X POST http://localhost:3000/api/login -H "Content-Type: application/json" -d "{\"username\": \"john\"}"
If the request is successful, the server will respond with a JSON object containing the generated JWT token:
{
    "token": "your-jwt-token-here"
}
Important: Copy the token returned in the response. You will use this token to authenticate requests to the private API endpoint.
4. Access Private API Endpoint (Protected Route)
The private API endpoint requires a valid JWT to access. Once you have the token from the previous step, you can access the private route by adding the token in the Authorization header of your request.
To do this:
- Make a
GETrequest to/api/privatewith the followingAuthorizationheader: curl -X GET http://localhost:3000/api/private -H "Authorization: Bearer <your-token>"
Replace <your-token> with the JWT token you received from the /api/login endpoint.
If the token is valid, the server will respond with a message containing your user information and a confirmation that you have access to the private endpoint:
{
    "message": "This is a protected endpoint.",
    "user": {
      "id": 1,
      "username": "john"
    }
  }
If the token is invalid or missing, you will receive a 401 Unauthorized error with a message like:
Invalid or missing token✅ Summary
Routing is central to building APIs and websites in Express. It allows us to define different behaviors for different endpoints. In this tutorial, we used both public and protected routes, served static content, and introduced JWT-based middleware authentication.